Installing Bathtub Drain Assembly - Tub Drain Off By 1 2 Worth Busting Concrete Diy Home Improvement Forum / The drain and the overfill tube.
Dapatkan link
Facebook
X
Pinterest
Email
Aplikasi Lainnya
Installing Bathtub Drain Assembly - Tub Drain Off By 1 2 Worth Busting Concrete Diy Home Improvement Forum / The drain and the overfill tube.. Actual costs will depend on job size, conditions, and options. Tub drains are typically two pieces: Install the trim and your done, but if you run into trouble you can ask for help on the forum. Use the bathroom cleaner and rags to remove any mold or mildew. Between the underside of the flange and the tub surface, there's a good amount of plumbers putty that seals the inside of the drain.
This is the newest place to search, delivering top results from across the web. The drain and the overfill tube. Advertisement step 1 clean the bottom of the bathroom sink drain, especially the area around the drain opening. Tub drains are typically two pieces: When you have cleaned the drain seat well, install the new plunger and rest it in the drain seat.
Can T Find A Tub Drain Assembly Diy Home Improvement Forum from www.diychatroom.com A clean surface helps the drain caulk to adhere better. The overflow tub secures to the top with screws through the cover plate that grabs the overflow tube. After you're done, replace the upper pipe and cover the joint with plumber's putty. Once you've loosened the nut connecting the drainpipe, completely unscrew it by hand and lift out the entire drain assembly. If the fittings on your bathtub drain are galvanized steel, use a penetrating lubricant like pb blaster to loosen the joints first. Video shows how to remove and replace a bathtub drain stopper. Flush the tub drain and overflow drain with a solution of 1 cup of vinegar and 1 cup of baking soda. When you have cleaned the drain seat well, install the new plunger and rest it in the drain seat.
Find updated content daily for installing a bathtub.
Then clean and reinstall the overflow faceplate and drain plug. How did this project turn out? Between the underside of the flange and the tub surface, there's a good amount of plumbers putty that seals the inside of the drain. This d.i.y video how to replace a bathtub drain or remove and install bath tub drain shows step by step in details how to remove or change an old bath tub d. For example, this tub drain assembly was done for a delta acrylic tub. Replacing or repairing your tub's drain/waste assembly is a snap with bathtub drain products made by watco, offered by your source for drain products, plumbingsupply.com ®.whether you need to install a new waste and overflow, or you want to update the look of your old one, we have just what you need. Advertisement step 1 clean the bottom of the bathroom sink drain, especially the area around the drain opening. Installing a bathroom sink drain assembly requires that these pieces all be connected together in the proper order. If the fittings on your bathtub drain are galvanized steel, use a penetrating lubricant like pb blaster to loosen the joints first. Video shows how to remove and replace a bathtub drain stopper. 5 separate the tub from the wall A bathtub drain wrench or sometimes called a drain key. And the directions called for dap 3.0 to be used between the drain and tub.
How did this project turn out? Now that the drain assembly is in place, apply silicone to both sides of each drain gasket. Then clean and reinstall the overflow faceplate and drain plug. 5 separate the tub from the wall Feed it down as far as you can.
7 Bathtub Plumbing Installation Drain Diagrams from edmondbathtubrefinishing.com However, if you have easy access underneath the bathtub, it may be easier to first connect the drain assembly to the tub, install the tub, and connect the plumbing to the house as a final step. This is the newest place to search, delivering top results from across the web. Thread the locknut onto the drain body and install the drain body add the friction washer and beveled gasket. To estimate costs for your project: Then clean and reinstall the overflow faceplate and drain plug. Pliers into the stopper body grate and thread it into the drainpipe. This d.i.y video how to replace a bathtub drain or remove and install bath tub drain shows step by step in details how to remove or change an old bath tub d. Advertisement step 1 clean the bottom of the bathroom sink drain, especially the area around the drain opening.
And the directions called for dap 3.0 to be used between the drain and tub.
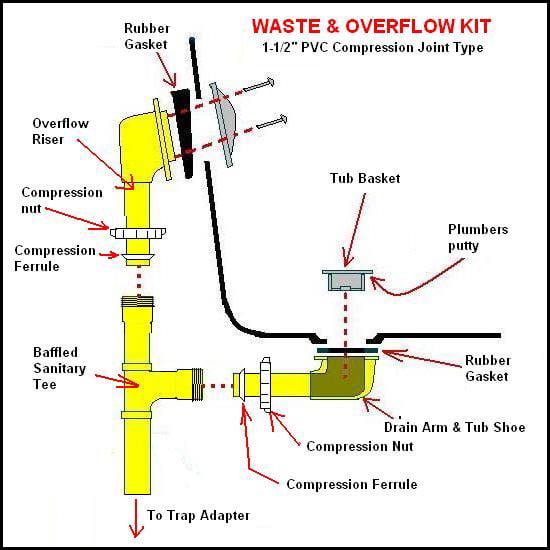
Tub drains are typically two pieces: Here are a few bathtub drain schematics and bathtub plumbing diagrams. Install the trim and your done, but if you run into trouble you can ask for help on the forum. Installing a bathroom sink drain assembly requires that these pieces all be connected together in the proper order. Then install the new drain linkage to the plunger. Video shows how to remove and replace a bathtub drain stopper. A bathtub trap begins at the end of the tub drain assembly, where it is glued onto a fitting screwed to the drain outlet. Pliers into the stopper body grate and thread it into the drainpipe. The overflow tub secures to the top with screws through the cover plate that grabs the overflow tube. As the diagram at right shows, the flange is held in place with a threaded connection to the drain elbow (aka drain shoe). Replacing or repairing your tub's drain/waste assembly is a snap with bathtub drain products made by watco, offered by your source for drain products, plumbingsupply.com ®.whether you need to install a new waste and overflow, or you want to update the look of your old one, we have just what you need. Next, push the drain body up through the lavatory hole from underneath. Use the bathroom cleaner and rags to remove any mold or mildew.
This video is a step by step instruction on how to replace a bathtub drain.if your tub begins to drain slowly or stops draining completely, it has probably b. 1 feed the spring coiled linkage into the overflow hole in the tub. After the plug is installed let the tub fill up and leak test the overflow. Once you've loosened the nut connecting the drainpipe, completely unscrew it by hand and lift out the entire drain assembly. How did this project turn out?
How To Replace A Bathtub Drain Flange from www.plumbingsupply.com Video shows how to remove and replace a bathtub drain stopper. Then install the new drain linkage to the plunger. Now that the drain assembly is in place, apply silicone to both sides of each drain gasket. Second, get the correct size drain assembly based on the size of the tub. Find updated content daily for installing a bathtub. This video is a step by step instruction on how to replace a bathtub drain.if your tub begins to drain slowly or stops draining completely, it has probably b. After you're done, replace the upper pipe and cover the joint with plumber's putty. A bathtub drain wrench or sometimes called a drain key.
Between the underside of the flange and the tub surface, there's a good amount of plumbers putty that seals the inside of the drain.
We show all the steps and hope the tips help you with your project.bathroom repa. A rubber gasket underneath the tub seals the drain elbow to the tub. Keep in mind the linkage rod catches hair and other debris, so it requires regular cleaning. Once you've loosened the nut connecting the drainpipe, completely unscrew it by hand and lift out the entire drain assembly. Advertisement step 1 clean the bottom of the bathroom sink drain, especially the area around the drain opening. Install the trim and your done, but if you run into trouble you can ask for help on the forum. Video shows how to remove and replace a bathtub drain stopper. Pliers into the stopper body grate and thread it into the drainpipe. Be sure to tighten the set screw. If the fittings on your bathtub drain are galvanized steel, use a penetrating lubricant like pb blaster to loosen the joints first. This d.i.y video how to replace a bathtub drain or remove and install bath tub drain shows step by step in details how to remove or change an old bath tub d. This video is a step by step instruction on how to replace a bathtub drain.if your tub begins to drain slowly or stops draining completely, it has probably b. Clean and install the replacement drain.
Rv Campgrounds El Paso Tx : Roadrunner Rv Park El Paso Texas Us Parkadvisor / Rvshare's el paso campground page can make finding the ideal campground a cinch. . Mission rv park in el paso is rated 6.3 of 10 at campground reviews. Bay landing rv campground offers visitors the trip of a lifetime. We sell travel trailers, sale price: Whether you're planning a relaxing getaway with you we offer class a rvs for large group trips and a range of class c rvs in a variety of different sizes. Featured facility rating restroom rating appearance rating distance. In colorado, el paso county is ranked 47th of 64 counties in campgrounds per capita. Experience a different side of tampa bay, and stay at one of tampa's beachfront campgrounds or breathtaking rv parks. Conveniently located restaurants include rose garden restaurant, great american steakhouse, and ernesto's mexican food. Click this button and we'll find all campgrounds within 25 miles of your curr...
Small Living Room Minimalist Design Concept Statement : 12 Best Minimalist Living Space Design For More Enchanting ... - The living room with a minimalist design looks fantastic with a sectional. . It's not all in the decor: Just get the color theme and place the necessary things only. What you need to do is finding the furniture or decoration with original or natural wooden pattern. To renovate a small apartment, you can use the concept of minimalist apartment design. Paint it pretty, with a row of pink couches set upon a white floor. Then, place it in the room with full modern and minimalist style furniture and color. If a piece of furniture is not functional, it's not needed. See more ideas about minimalist living room, living room decor, minimalist living. Even if your small apartment feels cramped, there's no reason to let it cramp your style! Proper lighting is an essential element of a living room in minimalist style and the big windows will prov...
Sportsman's Warehouse St George Ut / The Gunsmith At Sportsman S Warehouse Gunsmithing Gun Repair Shop In Salt Lake City : Opened in 2006, sportsman's warehouse in st. . George, ut is near multiple state and national parks, reservoirs, lakes,. We did not find results for: Check spelling or type a new query. Opened in 2006, sportsman's warehouse in st. Hours may change under current circumstances Hours may change under current circumstances Sportsman's warehouse st george ut. We did not find results for: Click here to shop now! Check spelling or type a new query. Utah Concealed Carry Class At Sportsmans Warehouse St George Ut from mylegalheat.com Click here to shop now! Hours may change under current circumstances Check spelling or type a new query. Sportsman's warehouse st george ut. Maybe you would like to learn more about one...


Komentar
Posting Komentar